Why Subfloor Prep is the Secret to Flawless Floors
When you step onto a brand-new floor, your eyes naturally draw to the surface details. You notice the deep, weathered grain of luxury vinyl planks the satin shimmer of newly finished hardwood or the cool, clean lines of large-format porcelain tile. A beautiful floor changes the entire atmosphere of a room, making it feel grander, cozier or more modern. However, the secret to that look and the solid feel under your feet lies completely out of sight.
Great flooring design is only as good as the surface underneath it. Before a single plank is clicked into place or any mortar is spread, the subfloor requires careful attention. Skipping this foundational step can lead to visible imperfections and irritating squeaks down the road. Taking the time to properly prepare your subfloor ensures your investment looks spectacular and performs at its best.
Ensuring a Flat and Stable Surface
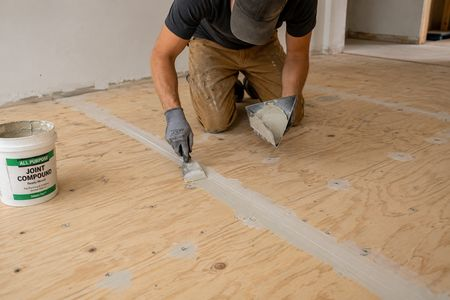
Every flooring material requires a flat surface to look its best, but different products have different tolerances for imperfections. If your subfloor has dips, ridges or slopes, your new surface will eventually telegraph those uneven spots. This means a minor bump in the plywood underneath can create a noticeable high point in your finished floor, causing premature wear or even a tripping hazard.
Hardwood planks are unforgiving when it comes to an uneven foundation. If you install large porcelain tiles over a subfloor that bows or dips, you run a high risk of lippage, where the edge of one tile sits higher than the piece next to it. This destroys the smooth, continuous look of your stonework and creates sharp edges that catch your shoes. For hardwood, an uneven subfloor means the tongues and grooves are placed under constant stress, which can eventually split the wood or cause the boards to separate.
Luxury vinyl planks and sheet vinyl are incredibly durable and comfortable underfoot, but they are highly flexible materials. This flexibility means they will contour to whatever is underneath them over time. A stray particle of grit, a proud nail head or a seam gap in the plywood will eventually telegraph straight through to the surface. By ensuring the substrate is completely clean, sanded and patched, you protect the sleek, smooth appearance of your resilient flooring.
Managing Sound and Structural Movement
The visual appeal of a floor is only part of the experience and how it sounds and feels when you walk across it matters just as much. A floor that flexes, creaks or pops every time you step into the room quickly loses its luxury appeal. These unwanted noises and movements are rarely a defect in the flooring material itself. Instead, they are almost always caused by loose subfloor panels rubbing against joists or fasteners.
Over years of foot traffic and seasonal humidity changes, the nails holding your subfloor to the underlying joists can loosen. Before installing new materials, walking the room to identify squeaks and driving screws into those areas is essential. Screws provide a much tighter, permanent grip than older nails, pulling the plywood tight against the framing. This simple mechanical correction prevents boards from rubbing together, eliminating those annoying phantom noises before your new floor covers them up.
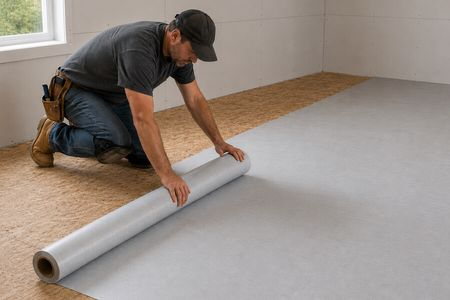
Underlayment acts as the crucial bridge between your subfloor and your finished flooring. Depending on your material choice, this might look like a high-density foam pad, a felt layer or a cement backer board. The right underlayment dampens footfall noise, cushions your stride and adds an extra layer of thermal insulation. Selecting the correct companion underlayment ensures your floors feel warm, quiet and comfortable.
Protecting Your Floor Against Moisture
Moisture is the quiet enemy of beautiful flooring. Whether your home sits on a concrete slab or has a traditional crawlspace, water vapor naturally moves upward through the structure. If this moisture becomes trapped directly beneath your new flooring, it can cause severe structural and cosmetic issues. Hardwood might cup or buckle, vinyl planks can un-click and adhesives can break down completely.
Concrete feels dry to the touch, but it acts like a sponge, holding onto moisture deep within its pores. This is especially true for newer concrete homes or basements. Before installing any flooring, performing a moisture test determines exactly how much vapor is escaping from the slab. If the levels are too high, applying a specialized primer or a heavy-duty vapor barrier protects your flooring from warp-inducing humidity.
For installations over crawlspaces or basements, a dedicated vapor retarder is often necessary. This is typically a thick poly sheeting laid directly over the subfloor before floating floors are installed. For glue-down applications, it involves using advanced adhesives that double as moisture membranes. This simple layer prevents moisture from reaching the backing of your flooring, keeping the installation stable and protecting your indoor air quality.
Creating Your Perfect Foundation
Investing time and attention into your subfloor is the ultimate way to guarantee that your new floors look exactly as you envisioned. While it is a part of the process you will never see once the project is finished, you will appreciate its impact with every quiet, solid step you take across your home. Beautiful design always begins from the ground up.
At Hubbard Flooring Studio, we’ll help you explore your options and find the right flooring for your home in Baton Rouge, LA.